# Deploy MLflow models on BigQuery
- Date: 2023-04-02
- Tags: mlflow, bigquery, serverless, mlops, python, machine-learning, cloud-run, remote-functions
- Canonical URL: https://zablo.net/blog/post/deploy-mlflow-models-on-bigquery-remote-functions/
Deploying machine learning models and making them easily accessible by other teams (especially data/business analysts) can be challenging. The landscape of MLOps tools in the recent months has exploded and opened a lot of opportunities for engineers (ML Engieeers / MLOps and you) to play with various systems and stich them together in creative and reliable way.
In this blogpost I will show you how you can easily **deploy MLflow models to GCP Cloud Run** service in a way that they could be consumed from BigQuery using **SQL**. I will achieve it by leveraging **BigQuery Remote Functions** feature.
> 💡 Recently (March 29, 2023) Google has announced a way to
deploy models directly in BigQuery, I've also made
a tutorial for this option here ➡️.
This blogpost shows an alternative option, which comes in handy, especially when you have custom logic / custom pre/post processing code in the models, that is not easily converted to ONNX format.
## What you will find below
1. [Training an AutoML model](#tpot)
2. [Creating BigQuery Remote Function with Fast API](#bq-remote-fn)
3. [Deploying MLflow model as a BigQuery Remote Function on Cloud Run](#deploy)
4. [Connecting from BigQuery to Remote Function](#bq-connection)
5. [Running the inference using custom model directly from BigQuery](#bq-mlflow-inference)
6. [Repo links & additional resources](#additional-links)
## Prerequisites
You will need:
* Python (I'm using 3.9)
* Docker
* access to Google Cloud Platform (BigQuery & Cloud Run)
* Artifact Registry for Docker / Google Container Registry available
## Training a simple model with TPOT's AutoML
As I've mentioned above, I will be not focusing on trainign the best-in-class model for the dataset, so for the simplicity, I'm using AutoML capabilities provided by the TPOT library.
The library has really simple API and the general workflow with it looks like this:
> 1. Load the data.
> 2. Create a classification or regression task
> 3. Set AutoML parameters, especially: number of generations, population size and paralleization level (they affect training time, usually - the longer = the better model)
> 4. Export the training pipeline - TPOT exports the *scratch version* of the training pipeline, that you can modify or copy to your existing project.
> 5. Modify the *scratch version* of the pipeline to load the data, train the model and *save it somewhere*.
For the *save it somewhere* part I will be using **MLflow** as it handles model serialization well: it not only saves (pickles) the trained model but also captures input data schema and input examples - this is really important from both usability and MLOps perspective, as you always know what to "send" to the model during inference.
In this blogpost, I will be using California Housing dataset (available directly from Scikit Learn).
Open requirements.txt
```python
cloudpickle==2.2.1
fastapi==0.92.0
uvicorn==0.21.0
mlflow
scikit-learn==1.2.1
pandas==1.5.3
tpot==0.11.7
numpy==1.23.5
scipy==1.10.1
```
```python
from functools import partial, update_wrapper
from sklearn.metrics import mean_absolute_error, mean_squared_error, r2_score
from tpot import TPOTRegressor
from sklearn.model_selection import train_test_split
from sklearn.datasets import fetch_california_housing
def main():
# split into train and test
dataset = fetch_california_housing(as_frame=True)
dataset.target = dataset.target * 100000
X_train, X_test, y_train, y_test = train_test_split(
dataset.data.astype(float),
dataset.target,
train_size=0.7,
test_size=0.3,
)
for ds, name in zip(
(X_train, X_test, y_train, y_test), ("X_train", "X_test", "y_train", "y_test")
):
ds.to_csv(f"{name}.csv", index=False)
# create and fit TPOT
tpot = TPOTRegressor(
generations=10,
population_size=50,
verbosity=2,
random_state=666,
n_jobs=-1,
scoring="neg_mean_absolute_error",
config_dict="TPOT light",
)
tpot.fit(X_train, y_train)
# calculate mean_absolute_error, means_squared_error, r2_score in a loop
predictions = tpot.predict(X_test)
for metric in [
mean_absolute_error,
update_wrapper(partial(mean_squared_error, squared=False), mean_squared_error),
r2_score,
]:
print(f"{metric.__name__}: {metric(y_test, predictions)}")
tpot.export("tpot_pipeline_TO_EDIT.py")
if __name__ == "__main__":
main()
```
After running the code above, you will see `tpot_pipeline_TO_EDIT.py` file in your working directory. It contains the best model that TPOT's AutoML has found.
I've copied this file as `tpot_pipeline.py` and edited it by adding:
* loading of my data
* saving the model in the MLflow format.
```python
import mlflow
import pandas as pd
from mlflow.models import infer_signature
from sklearn.feature_selection import VarianceThreshold
from sklearn.pipeline import make_pipeline
from sklearn.preprocessing import RobustScaler
from sklearn.svm import LinearSVR
from sklearn.tree import DecisionTreeRegressor
from tpot.builtins import StackingEstimator
from tpot.export_utils import set_param_recursive
X_train = pd.read_csv("X_train.csv")
y_train = pd.read_csv("y_train.csv")
with mlflow.start_run() as run:
# Average CV score on the training set was: -39252.13134203072
exported_pipeline = make_pipeline(
RobustScaler(),
VarianceThreshold(threshold=0.0001),
StackingEstimator(
estimator=LinearSVR(
C=10.0,
dual=True,
epsilon=0.1,
loss="squared_epsilon_insensitive",
tol=0.001,
)
),
DecisionTreeRegressor(max_depth=10, min_samples_leaf=14, min_samples_split=4),
)
# Fix random state for all the steps in exported pipeline
set_param_recursive(exported_pipeline.steps, "random_state", 666)
exported_pipeline.fit(X_train, y_train)
test_df = pd.read_csv("X_test.csv")
mlflow.sklearn.save_model(
exported_pipeline,
"model",
signature=infer_signature(X_train),
input_example=test_df.sample(n=7, random_state=666),
)
print("Done :)")
```
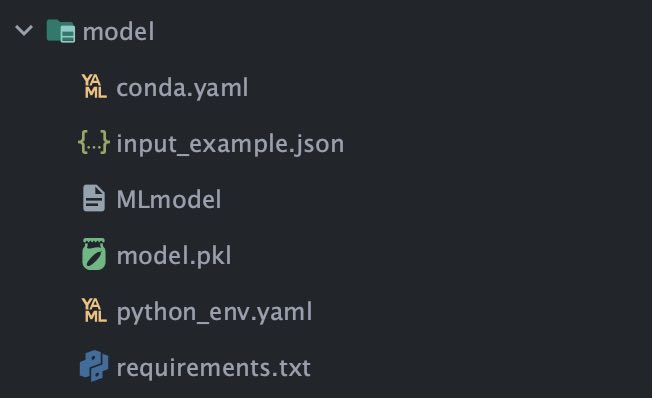
Once you run this script, the "best" model will be trained and saved on disk in the `model` folder. MLflow's model format is described here.
 ## Creating BigQuery Remote Function with Fast API
First, let me explain how the BigQuery Remote Functions work: you create either a Cloud Function or Cloud Run endpoint, which needs to implement a contract defined in the documentation. Then, you create a _Cloud resource connection_ in BigQuery - this will create a Service Account, that BQ will use to access the Cloud Function / Cloud Run service. After setting appropriate IAM to this service account, you create a definition for the remote function within BQ, specifying its signature, endpoint URL and options. Once everything is set, you will be able to run the Remote Function just like any other function in BigQuery - directly from SQL!
### BigQuery Remote Function contract
BigQuery has a well defined format of the requests its sending to any Remote Function. An example request looks like this:
```javascript
{
"requestId": "124ab1c",
"caller": "//bigquery.googleapis.com/projects/myproject/jobs/myproject:US.bquxjob_5b4c112c_17961fafeaf",
"sessionUser": "test-user@test-company.com",
"userDefinedContext": {
"key1": "value1",
"key2": "v2" // <--- any metadata you like to attach (it's defined when you register the function in BQ)
},
"calls": [
[null, 1, "", "abc"], // <--- first row from the request
["abc", "9007199254740993", null, null] // <--- second row from the request
]
}
```
In order to implement a FastAPI endpoint accepting requests in the format shown above, let's create a `pydantic` dataclass for it:
```python
from typing import Dict, List, Any, Optional
from pydantic import BaseModel
class BigQueryUDFRequest(BaseModel):
request_id: Optional[str]
caller: str
sessionUser: str
userDefinedContext: Optional[Dict]
calls: List[List[Any]] = []
```
The response contract is simpler, it only needs a single `replies` field, as shown below.
```python
class BigQueryUDFResponse(BaseModel):
replies: List[Any]
```
Last thing - BigQuery Remote Functions only support root level endpoints - that means, that the endpoint in the FastAPI must accept `POST` requests on the `/` (root) path. No nested paths are allowed at the moment of writing this blogpost.
### Remote Function endpoint
Definition of an endpoint and the FastAPI appplication looks like this:
```python
import mlflow.sklearn
import pandas as pd
from fastapi import FastAPI
from api.models import BigQueryUDFRequest, BigQueryUDFResponse, AppContext
app = FastAPI()
ctx = AppContext()
@app.on_event("startup")
def load_model():
# Load your MLflow model here
ctx.model = mlflow.sklearn.load_model("model")
@app.post("/", response_model=BigQueryUDFResponse)
def udf(request: BigQueryUDFRequest):
df = pd.DataFrame(request.calls)
# Optionally - parse the request, do some logging etc
predictions = ctx.model.predict(df)
return BigQueryUDFResponse(replies=predictions.tolist())
```
The `AppContext` is defined like this:
```python
@dataclass
class AppContext:
model: Any = None
```
## Creating BigQuery Remote Function with Fast API
First, let me explain how the BigQuery Remote Functions work: you create either a Cloud Function or Cloud Run endpoint, which needs to implement a contract defined in the documentation. Then, you create a _Cloud resource connection_ in BigQuery - this will create a Service Account, that BQ will use to access the Cloud Function / Cloud Run service. After setting appropriate IAM to this service account, you create a definition for the remote function within BQ, specifying its signature, endpoint URL and options. Once everything is set, you will be able to run the Remote Function just like any other function in BigQuery - directly from SQL!
### BigQuery Remote Function contract
BigQuery has a well defined format of the requests its sending to any Remote Function. An example request looks like this:
```javascript
{
"requestId": "124ab1c",
"caller": "//bigquery.googleapis.com/projects/myproject/jobs/myproject:US.bquxjob_5b4c112c_17961fafeaf",
"sessionUser": "test-user@test-company.com",
"userDefinedContext": {
"key1": "value1",
"key2": "v2" // <--- any metadata you like to attach (it's defined when you register the function in BQ)
},
"calls": [
[null, 1, "", "abc"], // <--- first row from the request
["abc", "9007199254740993", null, null] // <--- second row from the request
]
}
```
In order to implement a FastAPI endpoint accepting requests in the format shown above, let's create a `pydantic` dataclass for it:
```python
from typing import Dict, List, Any, Optional
from pydantic import BaseModel
class BigQueryUDFRequest(BaseModel):
request_id: Optional[str]
caller: str
sessionUser: str
userDefinedContext: Optional[Dict]
calls: List[List[Any]] = []
```
The response contract is simpler, it only needs a single `replies` field, as shown below.
```python
class BigQueryUDFResponse(BaseModel):
replies: List[Any]
```
Last thing - BigQuery Remote Functions only support root level endpoints - that means, that the endpoint in the FastAPI must accept `POST` requests on the `/` (root) path. No nested paths are allowed at the moment of writing this blogpost.
### Remote Function endpoint
Definition of an endpoint and the FastAPI appplication looks like this:
```python
import mlflow.sklearn
import pandas as pd
from fastapi import FastAPI
from api.models import BigQueryUDFRequest, BigQueryUDFResponse, AppContext
app = FastAPI()
ctx = AppContext()
@app.on_event("startup")
def load_model():
# Load your MLflow model here
ctx.model = mlflow.sklearn.load_model("model")
@app.post("/", response_model=BigQueryUDFResponse)
def udf(request: BigQueryUDFRequest):
df = pd.DataFrame(request.calls)
# Optionally - parse the request, do some logging etc
predictions = ctx.model.predict(df)
return BigQueryUDFResponse(replies=predictions.tolist())
```
The `AppContext` is defined like this:
```python
@dataclass
class AppContext:
model: Any = None
```
### Testing out the endpoint locally
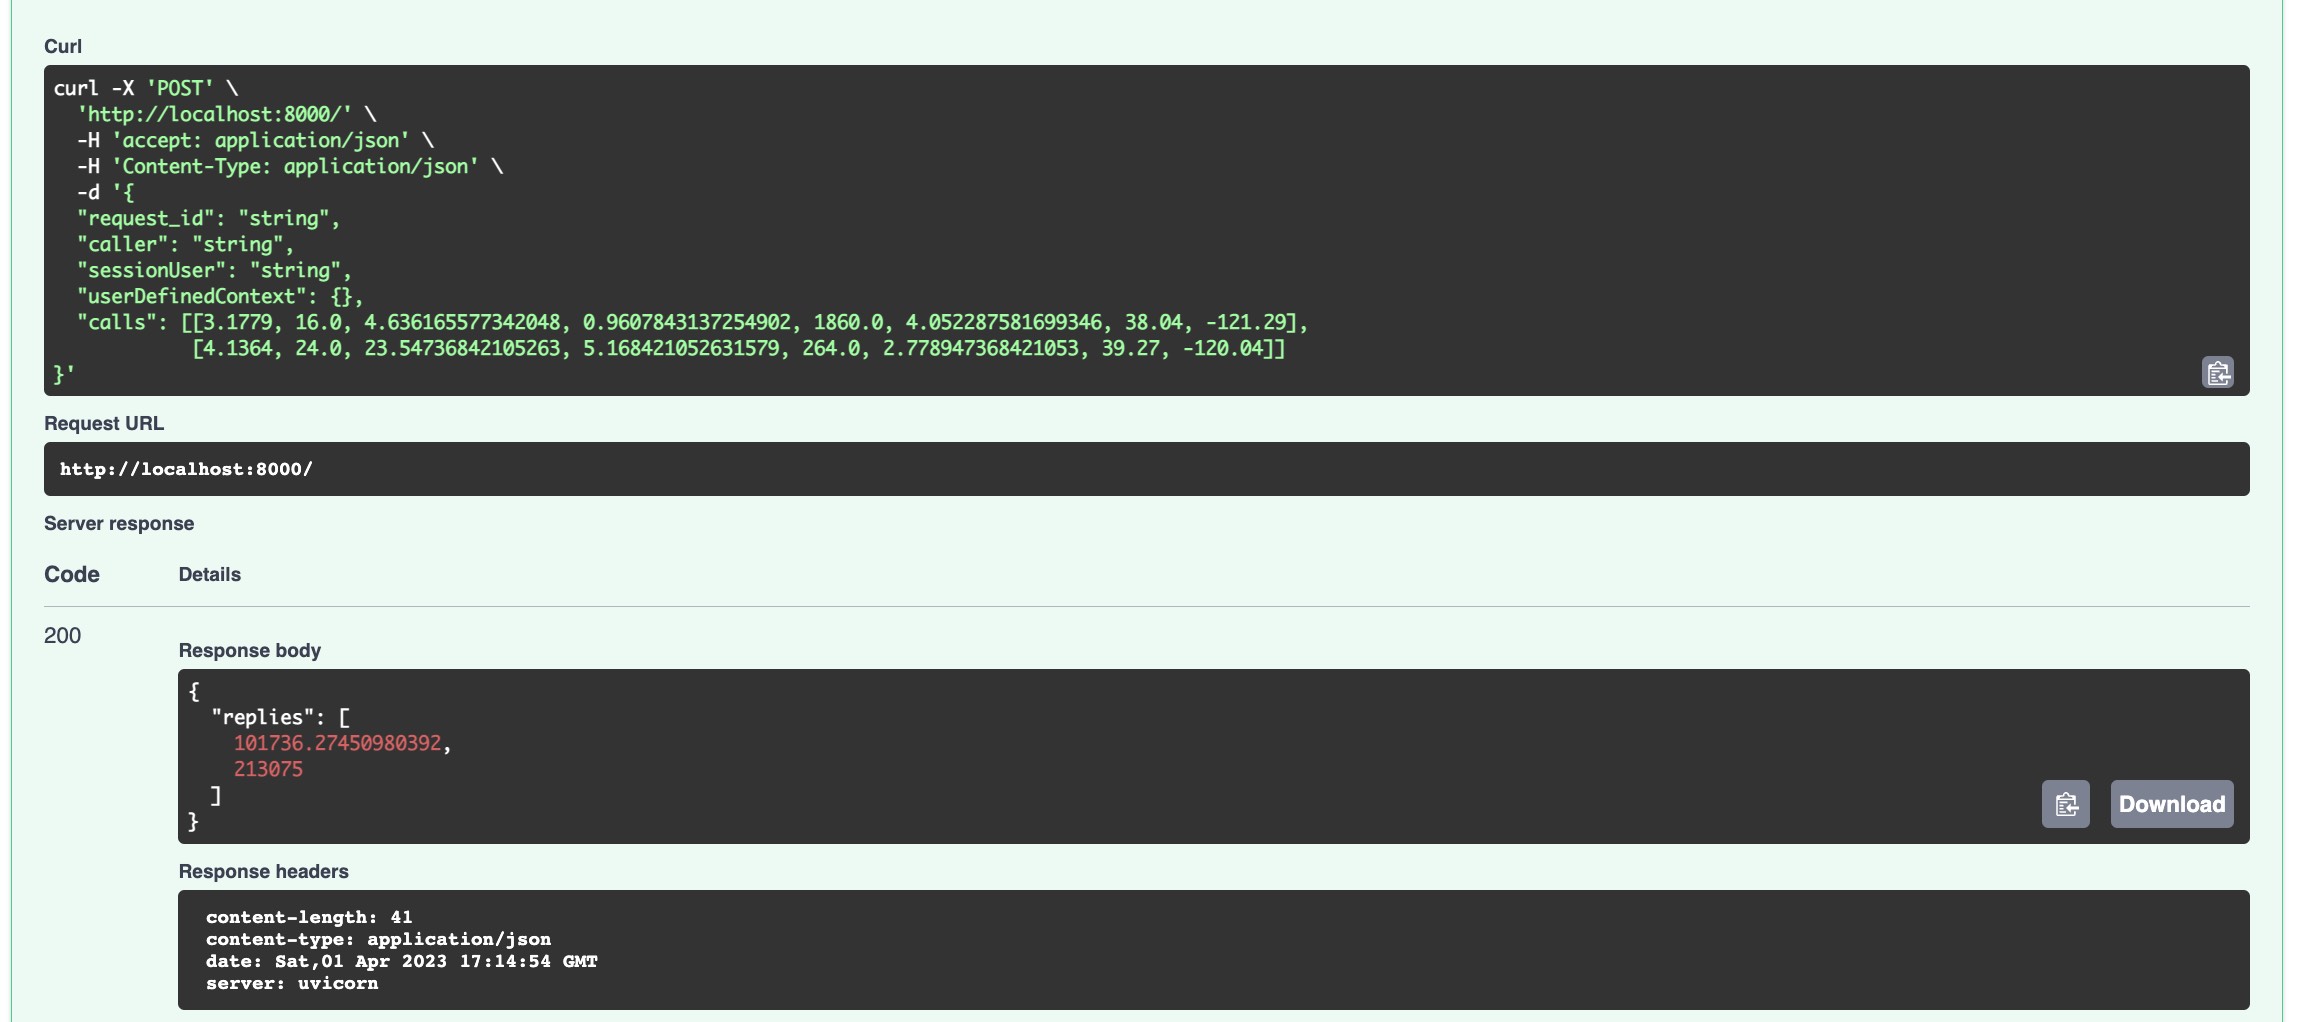
Once you run the app locally, you can either open http://localhost:8000/docs and send requests from Swagger UI, or use `curl`. For my AutoML model, the request looks like this:
```bash
curl -X 'POST' \
'http://localhost:8000/' \
-H 'accept: application/json' \
-H 'Content-Type: application/json' \
-d '{
"request_id": "string",
"caller": "string",
"sessionUser": "string",
"userDefinedContext": {},
"calls": [[3.1779, 16.0, 4.636165577342048, 0.9607843137254902, 1860.0, 4.052287581699346, 38.04, -121.29],
[4.1364, 24.0, 23.54736842105263, 5.168421052631579, 264.0, 2.778947368421053, 39.27, -120.04]]
}'
```
As you can see, batch requests are possible out-of-the-box.
## Deploying Remote Function to Cloud Run
### Building a Docker container
First, a docker container with our custom function needs to be build.
> For tutorial purposes, the MLflow model will be copied into the container itself. In production scenarios, you will most likely load the model on the fly from GCS during the container startup process.
An `ENTRYPOINT` for Cloud Run and Fast API can look like this (save this as `run.sh`). It's important to dyunamically use the `$PORT` environment variable, as it will be set by the Cloud Run's runtime.
```python
#!/bin/bash
set -e
exec uvicorn bq_api:app --proxy-headers --host 0.0.0.0 --port $PORT
```
... and the Dockerfile itself:
```python
FROM python:3.9.16-slim
WORKDIR /app
COPY requirements.txt .
RUN pip install -r requirements.txt --no-cache-dir
COPY . .
RUN chmod +x ./run.sh
ENV PORT 8000
ENTRYPOINT ["./run.sh"]
```
Build the docker image.
```python
export IMAGE="us-east1-docker.pkg.dev//mlflow-bq-example:20220401-1942"
# On Macs with M1/M2 processor:
docker buildx build --platform=linux/amd64 -t $IMAGE .
# On Linux/other:
docker build -t $IMAGE .
```
Now, push the image to the Artifact Registry / Container Registry (`docker push $IMAGE`).
### Create Cloud Run service
With `GCLOUD CLI`, deployment to Cloud Run is a one-liner. The command provides sensible defaults for the tutorial purposes.
```bash
gcloud run deploy mlflow-bigquery \
--cpu 1 --memory 1Gi --image=$IMAGE \
--region=us-east1 --no-allow-unauthenticated
```
after a few seconds, the deployment should finish:
```bash
Deploying container to Cloud Run service [mlflow-bigquery] in project [] region [us-east1]
✓ Deploying new service... Done.
✓ Creating Revision...
✓ Routing traffic...
Done.
Service [mlflow-bigquery] revision [mlflow-bigquery-00001-yav] has been deployed and is serving 100 percent of traffic.
Service URL: https://mlflow-bigquery-xyz123-ue.a.run.app
```
Thanks to the `--no-allow-unauthenticated`, the Cloud Run service will be protected from unauthorized access by default. In order to send an authorized requests to the Cloud Run service, use the following command:
```bash
curl -X 'POST' \
'https://mlflow-bigquery-xyz123-ue.a.run.app' \
-H 'accept: application/json' \
-H 'Content-Type: application/json' \
-H "Authorization: Bearer $(gcloud auth print-identity-token)" \
-d '{
"request_id": "string",
"caller": "string",
"sessionUser": "string",
"userDefinedContext": {},
"calls": [[3.1779, 16.0, 4.636165577342048, 0.9607843137254902, 1860.0, 4.052287581699346, 38.04, -121.29],
[4.1364, 24.0, 23.54736842105263, 5.168421052631579, 264.0, 2.778947368421053, 39.27, -120.04]]
}'
```
result should be exactly the same as before.
## Connecting from BigQuery to Cloud Run
> ⚠️ Before proceeding, make sure that you have `BigQuery Connection API` enabled in your GCP project.
You can either configure the connection from UI or use command line.
### (option 1) From UI
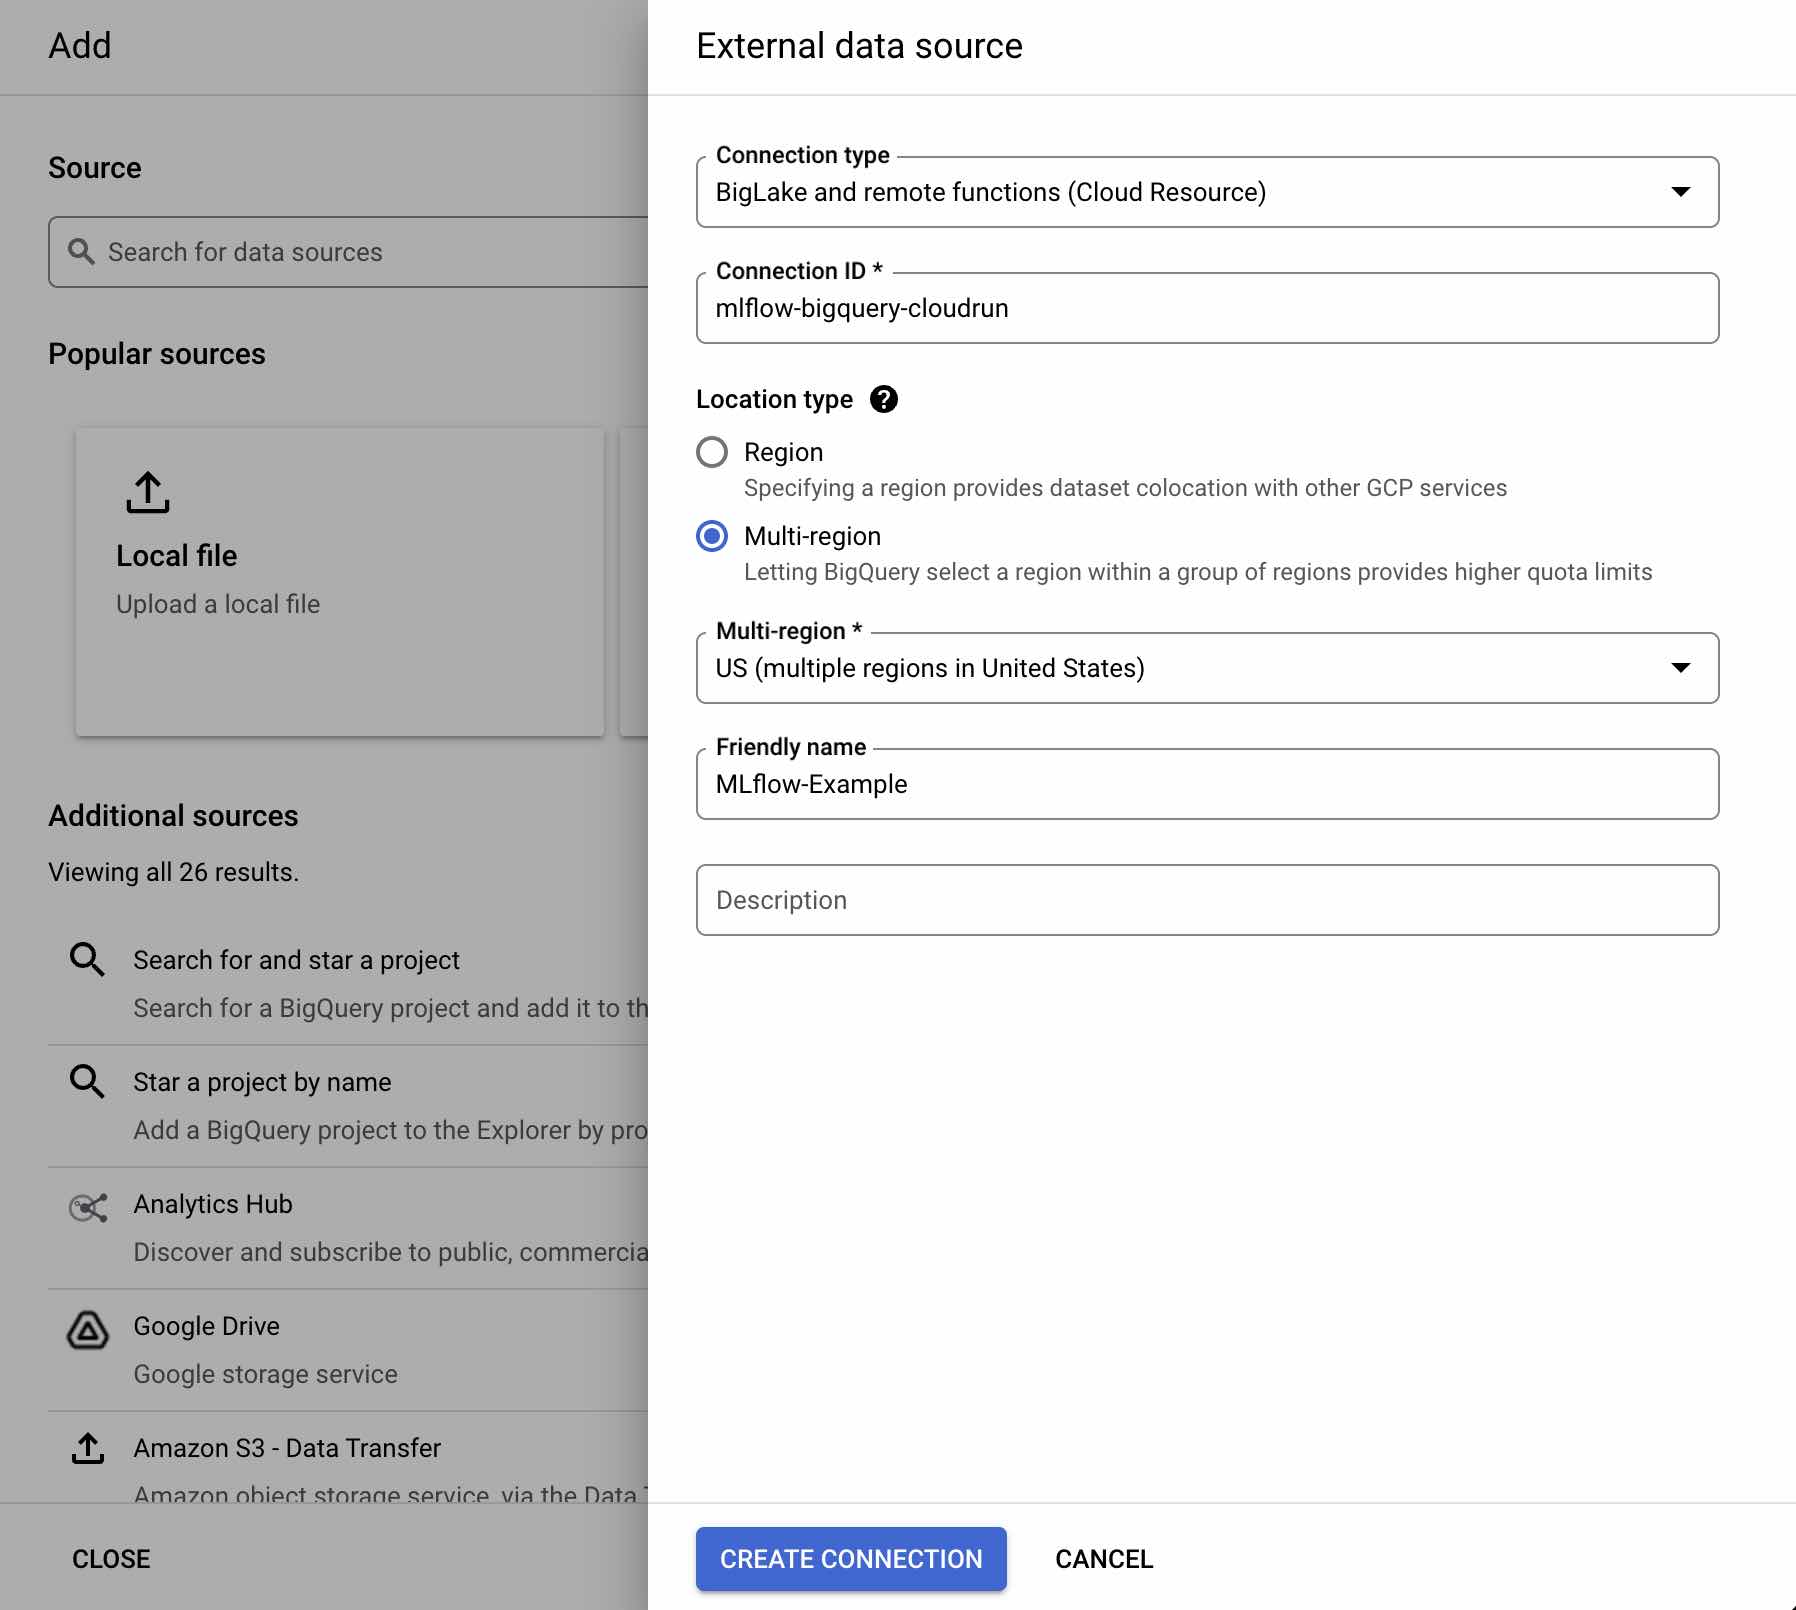
1. Click _Add_
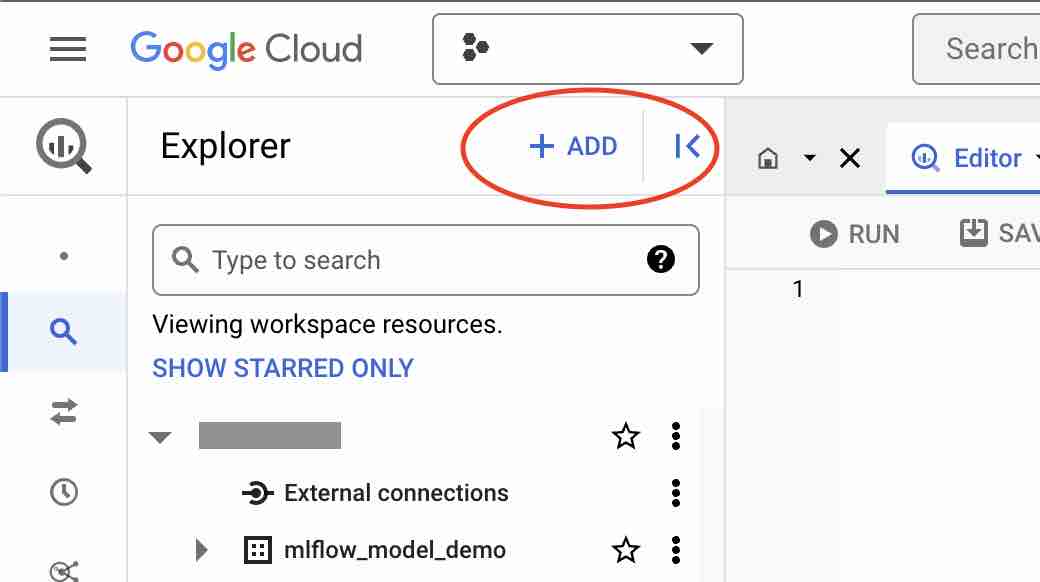 2. Click _Connections to external data sources_
3. Fill in the form, in the Connection type list, use `BigLake and remote functions (Cloud Resource)`.
4. Click _Create connection_ button.
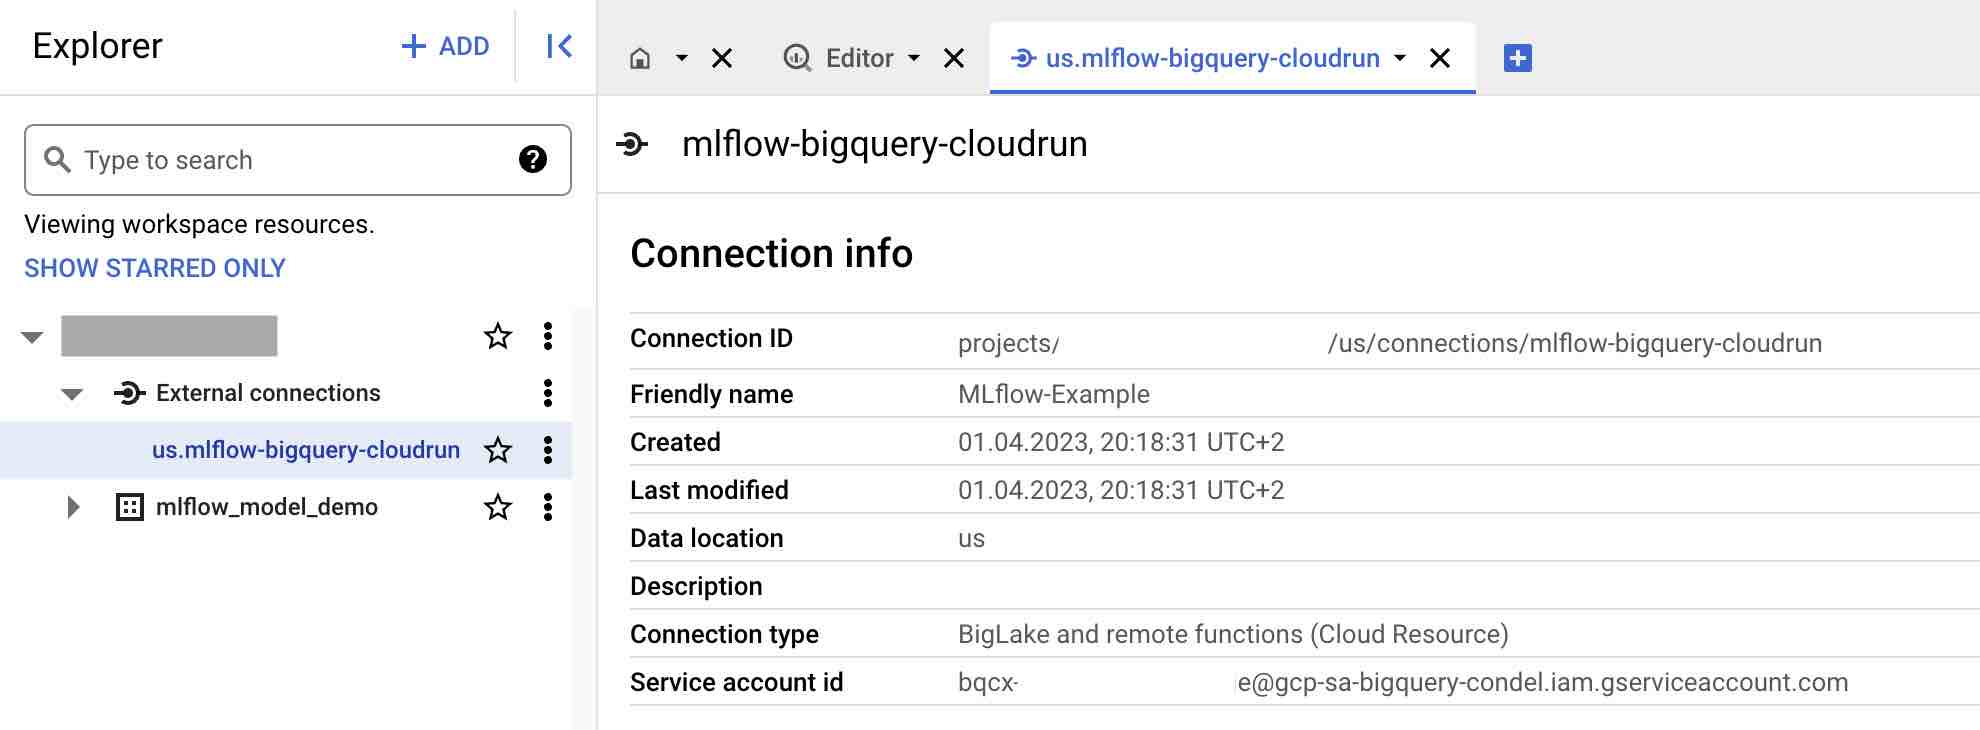
5. In the left pane, open _External connections_ and view the created connection details. Copy _Service account id_ for later use.
### (option 2) From CLI
```bash
bq mk --connection --location=US --project_id= \
--connection_type=CLOUD_RESOURCE mlflow-cloudrun-cli
```
```javascript
bq show --format=prettyjson --connection .US.mlflow-cloudrun-cli
{
"cloudResource": {
"serviceAccountId": "bqcx-@gcp-sa-bigquery-condel.iam.gserviceaccount.com"
},
"creationTime": "1680373492742",
"lastModifiedTime": "1680373492742",
"name": "projects//locations/us/connections/mlflow-cloudrun-cli"
}
```
---
Once the _External connection_ and service account id is created, we need to allow this service to access Cloud Run.
```bash
gcloud run services add-iam-policy-binding mlflow-bigquery \
--member='serviceAccount:bqcx-@gcp-sa-bigquery-condel.iam.gserviceaccount.com' \
--role='roles/run.invoker' --region=us-east1
```
## Running the inference from BigQuery
Now it's time to create the actual function to invoke from BigQuery. Open query editor and create function definition similar to the one below. Make sure that you set the number of parameters right.
> 💡 The `max_batching_rows = 128` parameter is really important as it affects performance of the inference - it effectively tells BigQuery, how many rows of the input table to send to Cloud Run in a single request. Setting the `max_batching_rows` as well as the `concurrency` in the Cloud Run (max requests per container) allows to fine-tune the inference performance.
```sql
CREATE OR REPLACE FUNCTION `.mlflow_model_demo`.predict(
MedInc FLOAT64,
HouseAge FLOAT64,
AveRooms FLOAT64,
AveBedrms FLOAT64,
Population FLOAT64,
AveOccup FLOAT64,
Latitude FLOAT64,
Longitude FLOAT64
) RETURNS FLOAT64
REMOTE WITH CONNECTION `.US.mlflow-bigquery-cloudrun`
OPTIONS (
endpoint = 'https://mlflow-bigquery-xyz123-ue.a.run.app'
max_batching_rows = 128
)
```
The above statement will create a new custom function named `predict` in the `mlflow_model_demo` dataset. After successful run, the following message should display in the query results panel:
```bash
This statement created a new function named .mlflow_model_demo.predict.
```
---
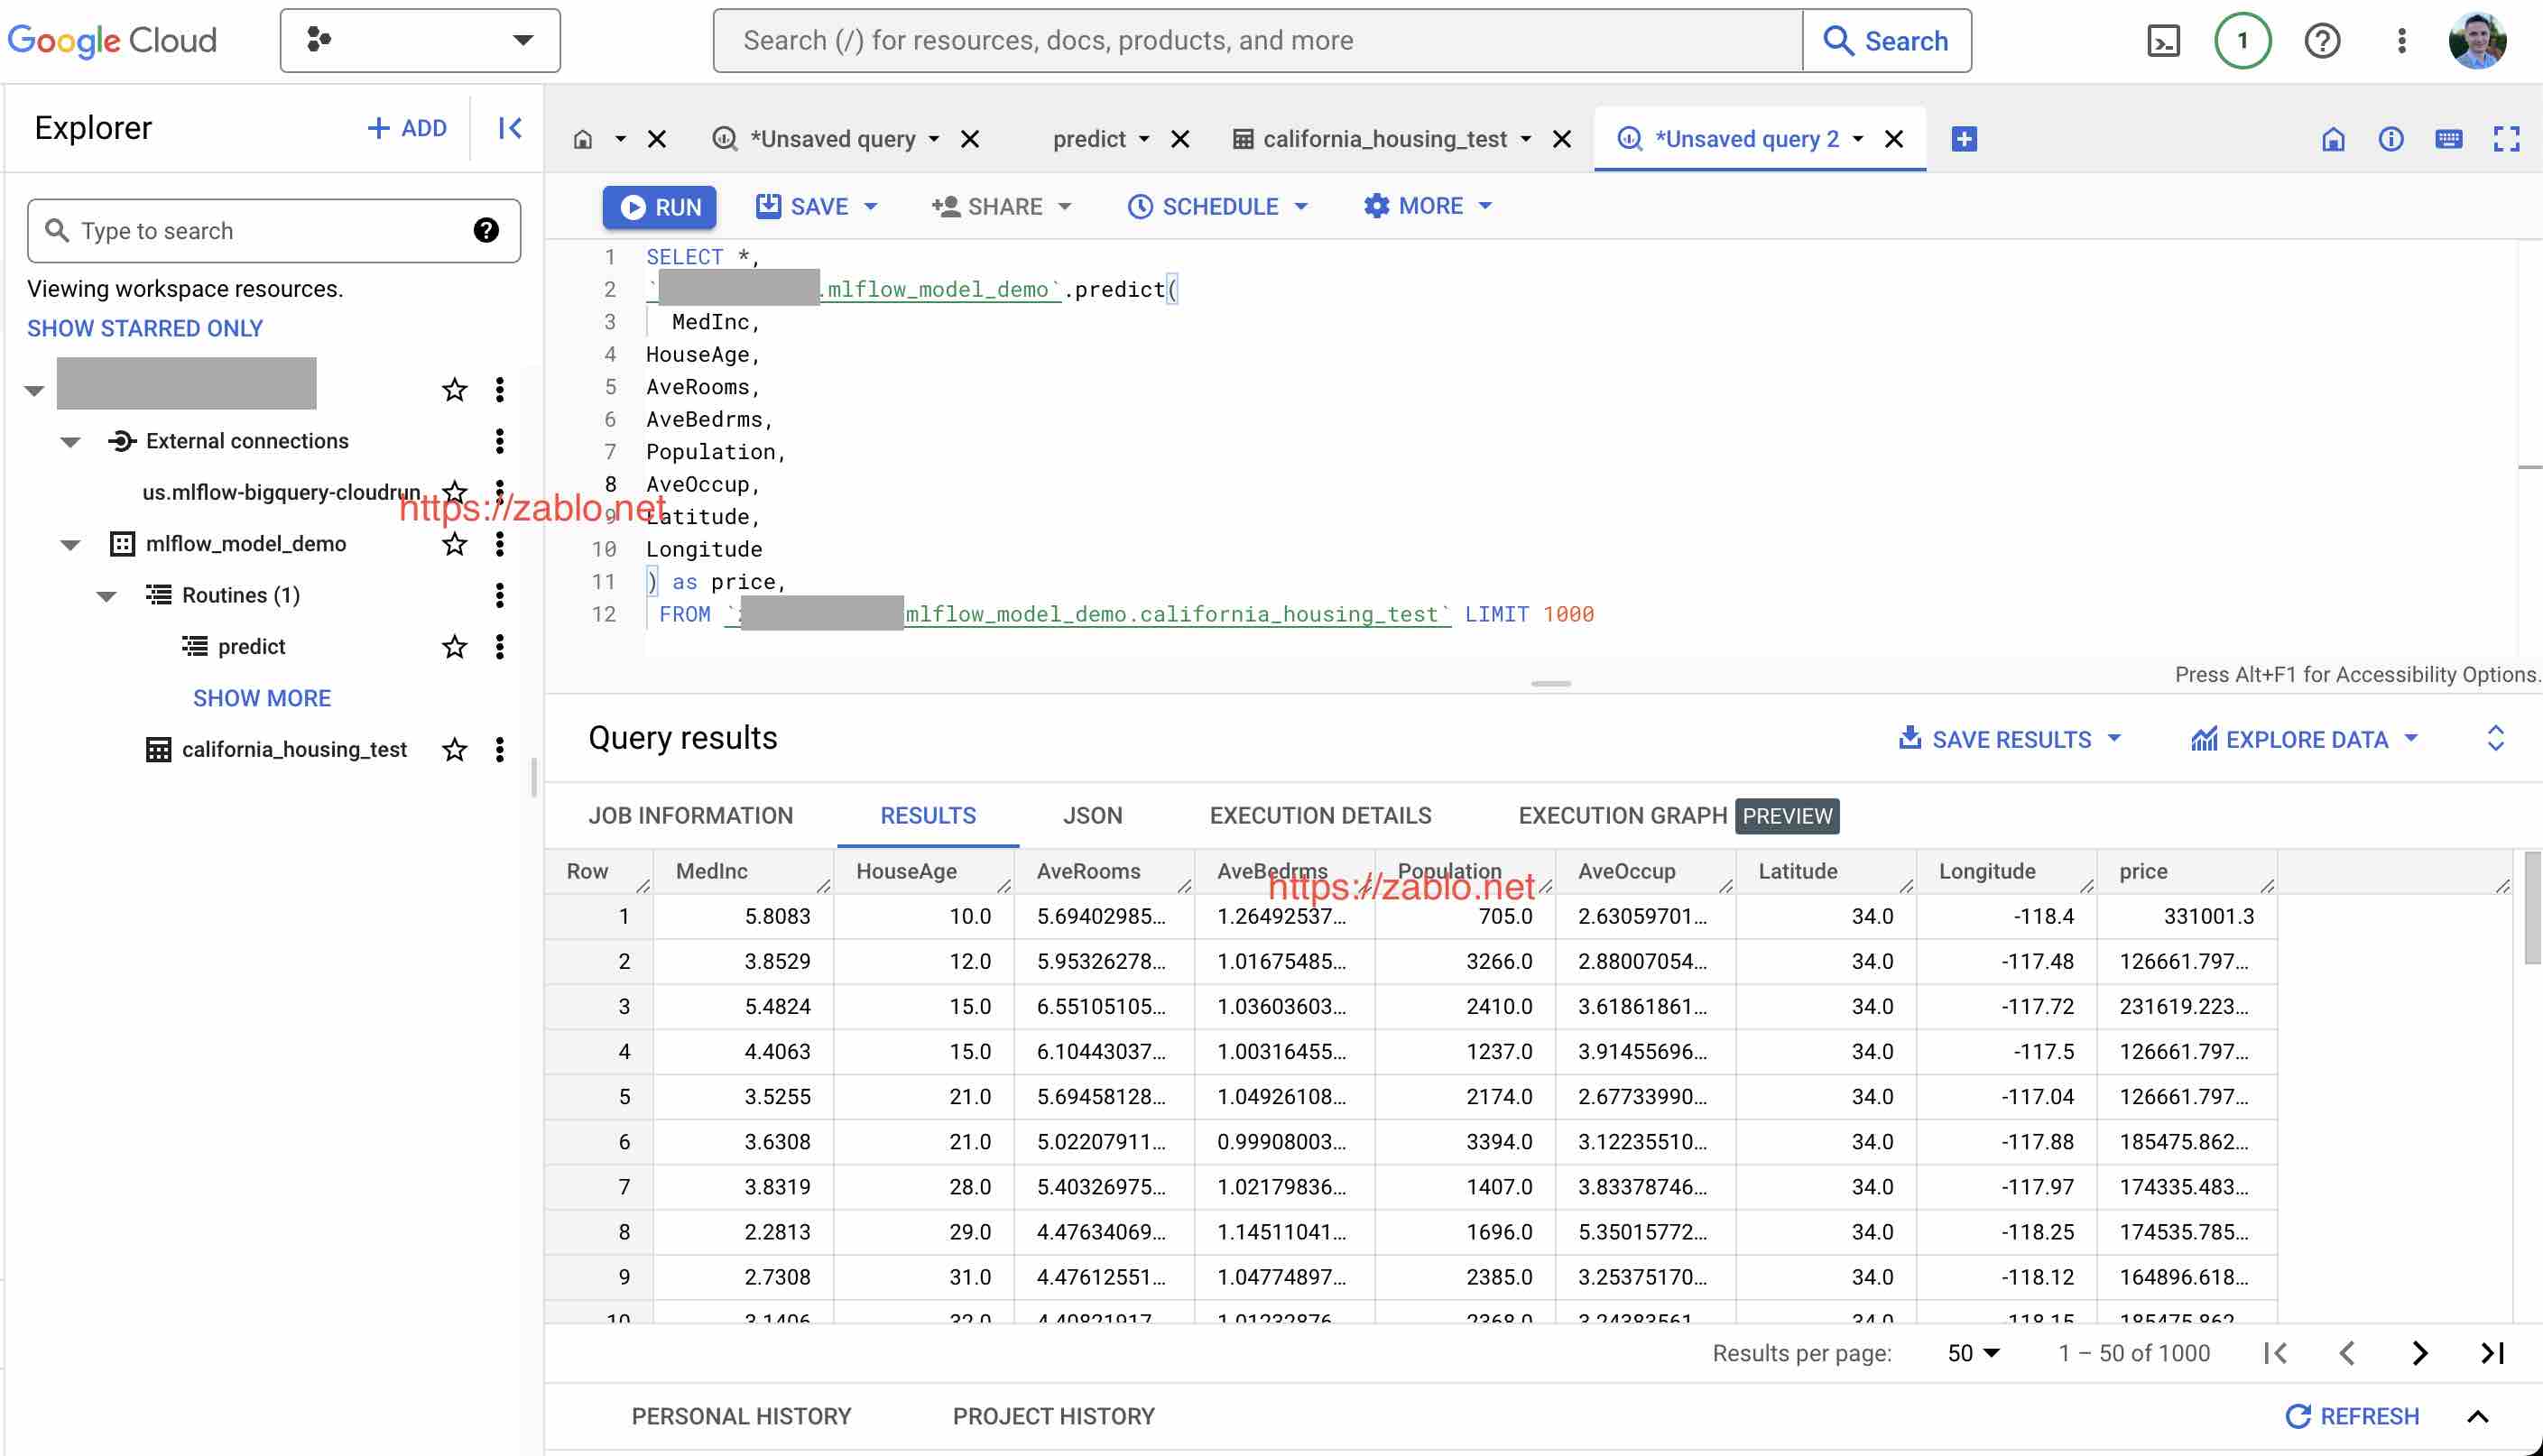
Once the function is created, let's use it!
```sql
SELECT *,
`.mlflow_model_demo`.predict(
MedInc,
HouseAge,
AveRooms,
AveBedrms,
Population,
AveOccup,
Latitude,
Longitude
) as price,
FROM `.mlflow_model_demo.california_housing_test` LIMIT 1000
```
after a few seconds, results will display:
---
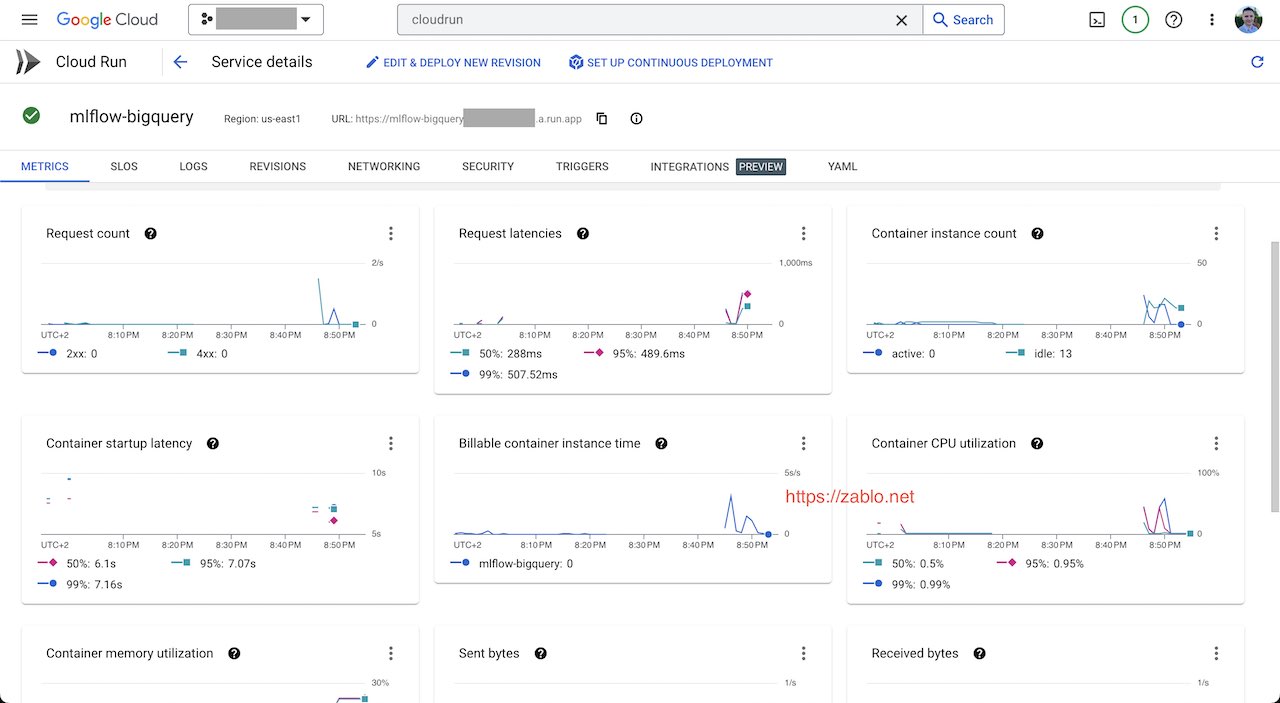
In the Cloud Run dashboard, you will be able to observe the performance metrics - they will be an useful input for setting the `max_batching_rows` in BQ and `concurrency` in Cloud Run to achieve optimal ML model inference performance in this setup.
## 💡Pro-tips
Here's a bunch of pr0-tips useful while working with this setup:
### MLflow model saving
1. When you save the model in MLflow, use `input_example` parameter of `save_model`- it will give you a JSON with exact data shape and types that your model accepts.
2. Also in MLflow, use `mlflow.models.signature.infer_signature` and `signature` param of `save_model` to capture metadata about data types - also useful for future debugging.
### Multiple Remote Functions in a single endpoint
You actually CAN have multiple BigQuery Remote Functions deployed in a single Cloud Run Service. In order to do this, you need to specify `user_defined_context` during function create and handle routing in the root endpoint on your own.
2. Click _Connections to external data sources_
3. Fill in the form, in the Connection type list, use `BigLake and remote functions (Cloud Resource)`.
4. Click _Create connection_ button.
5. In the left pane, open _External connections_ and view the created connection details. Copy _Service account id_ for later use.
### (option 2) From CLI
```bash
bq mk --connection --location=US --project_id= \
--connection_type=CLOUD_RESOURCE mlflow-cloudrun-cli
```
```javascript
bq show --format=prettyjson --connection .US.mlflow-cloudrun-cli
{
"cloudResource": {
"serviceAccountId": "bqcx-@gcp-sa-bigquery-condel.iam.gserviceaccount.com"
},
"creationTime": "1680373492742",
"lastModifiedTime": "1680373492742",
"name": "projects//locations/us/connections/mlflow-cloudrun-cli"
}
```
---
Once the _External connection_ and service account id is created, we need to allow this service to access Cloud Run.
```bash
gcloud run services add-iam-policy-binding mlflow-bigquery \
--member='serviceAccount:bqcx-@gcp-sa-bigquery-condel.iam.gserviceaccount.com' \
--role='roles/run.invoker' --region=us-east1
```
## Running the inference from BigQuery
Now it's time to create the actual function to invoke from BigQuery. Open query editor and create function definition similar to the one below. Make sure that you set the number of parameters right.
> 💡 The `max_batching_rows = 128` parameter is really important as it affects performance of the inference - it effectively tells BigQuery, how many rows of the input table to send to Cloud Run in a single request. Setting the `max_batching_rows` as well as the `concurrency` in the Cloud Run (max requests per container) allows to fine-tune the inference performance.
```sql
CREATE OR REPLACE FUNCTION `.mlflow_model_demo`.predict(
MedInc FLOAT64,
HouseAge FLOAT64,
AveRooms FLOAT64,
AveBedrms FLOAT64,
Population FLOAT64,
AveOccup FLOAT64,
Latitude FLOAT64,
Longitude FLOAT64
) RETURNS FLOAT64
REMOTE WITH CONNECTION `.US.mlflow-bigquery-cloudrun`
OPTIONS (
endpoint = 'https://mlflow-bigquery-xyz123-ue.a.run.app'
max_batching_rows = 128
)
```
The above statement will create a new custom function named `predict` in the `mlflow_model_demo` dataset. After successful run, the following message should display in the query results panel:
```bash
This statement created a new function named .mlflow_model_demo.predict.
```
---
Once the function is created, let's use it!
```sql
SELECT *,
`.mlflow_model_demo`.predict(
MedInc,
HouseAge,
AveRooms,
AveBedrms,
Population,
AveOccup,
Latitude,
Longitude
) as price,
FROM `.mlflow_model_demo.california_housing_test` LIMIT 1000
```
after a few seconds, results will display:
---
In the Cloud Run dashboard, you will be able to observe the performance metrics - they will be an useful input for setting the `max_batching_rows` in BQ and `concurrency` in Cloud Run to achieve optimal ML model inference performance in this setup.
## 💡Pro-tips
Here's a bunch of pr0-tips useful while working with this setup:
### MLflow model saving
1. When you save the model in MLflow, use `input_example` parameter of `save_model`- it will give you a JSON with exact data shape and types that your model accepts.
2. Also in MLflow, use `mlflow.models.signature.infer_signature` and `signature` param of `save_model` to capture metadata about data types - also useful for future debugging.
### Multiple Remote Functions in a single endpoint
You actually CAN have multiple BigQuery Remote Functions deployed in a single Cloud Run Service. In order to do this, you need to specify `user_defined_context` during function create and handle routing in the root endpoint on your own.
See the code
```SQL
CREATE OR REPLACE FUNCTION `.mlflow_model_demo`.other_function(
col1 FLOAT64,
col1 FLOAT64,
) RETURNS FLOAT64
REMOTE WITH CONNECTION `.US.mlflow-bigquery-cloudrun`
OPTIONS (
user_defined_context = [("function", "other-function")]
)
```
Then, in the function handler in FastAPI do the routing on the contents of `request.userDefinedContext` dictionary
```python
@app.post("/", response_model=BigQueryUDFResponse)
def udf(request: BigQueryUDFRequest):
df = pd.DataFrame(request.calls)
if request.userDefinedContext["function"] == "predict":
results = ctx.model.predict(df)
elif request.userDefinedContext["function"] == "other-function":
results = call.other.function()
return BigQueryUDFResponse(replies=results.tolist())
```
## Summary
I hope that this post helped you to deploy any custom MLflow model to Cloud Run and use it directly from BigQuery just like any other SQL function.
## Additional links & resources
* GitHub repo with full project - https://github.com/marrrcin/mlflow-bigquery-remote-function
* Deploying secure MLflow on App Engine: https://getindata.com/blog/deploying-mlflow-google-cloud-platform-using-app-engine/
* Deploying secure MLflow on Cloud Run: https://getindata.com/blog/deploying-serverless-mlflow-google-cloud-platform-using-cloud-run/